Photos and text by Tom Kreyche


Introduction
- Here's how to open the Nook Simple Touch case. It's easy to do - you only have to remove one screw.
- You might want to do this to replace the battery, connect to the internal (unused) UART or just take a look.
- You can find video tutorials on YouTube if you prefer, or at Tech Republic.
Cautions
- These instructions only apply to the Nook Simple Touch.
- If you're not careful, you could damage your Nook.
- You will probably be voiding any warranties.
- Only use minimal force.
- Don't pry on anything unless the instructions explicitly tell you to do so.
- Electronics can be damaged by static electricity - ideally you should be grounded with a wrist strap or at the very least have a ground where you can discharge any static buildup.
Required Tools
- T5 Torx wrench - this is a very small wrench. If you buy a Torx kit, make sure it has a T5 since many kits only go down to T6.
- Small, thin-bladed flat screwdriver or small thin knife.
Get Started
- Use a large flat work space, and consider covering it will a soft cloth or towel.
- Turn power off by holding the power button down for 5 seconds or so, then select "Power Down' in the dialog box.
- If you have a micro SD card in your Nook, remove it. If you leave in the card slot, it could get damaged. Leave the SD cover open.
- Turn your Nook over so you can see the curved plastic switch cover, which on the back. It has an On/Off symbol on it.
Remove Switch Cover
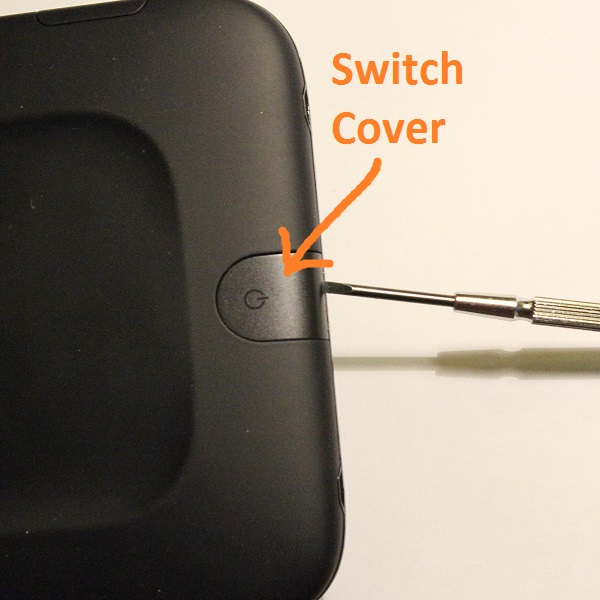
- Slip your thin screwdriver or knife blade between the switch cover and the case, and gently pry it up a little, then take it off the rest of the way with your fingernails.
- The switch cover has little plastic tabs on the sides, so it might actually be better to pry from the side rather than the front, as shown in this photo - slip in the blade wherever there is the largest gap.
- You may mar the plastic slightly - if you care about this don't bother taking the device apart.
- The little tabs don't seem susceptible to breaking, but if you pried the cover off many times they will probably get stressed and break eventually.
- Check to see if you might have turned the Nook back on accidentally while working on the switch cover - if so turn it back off - just look for the small switch button (white in pix below).

Remove the Torx Screw
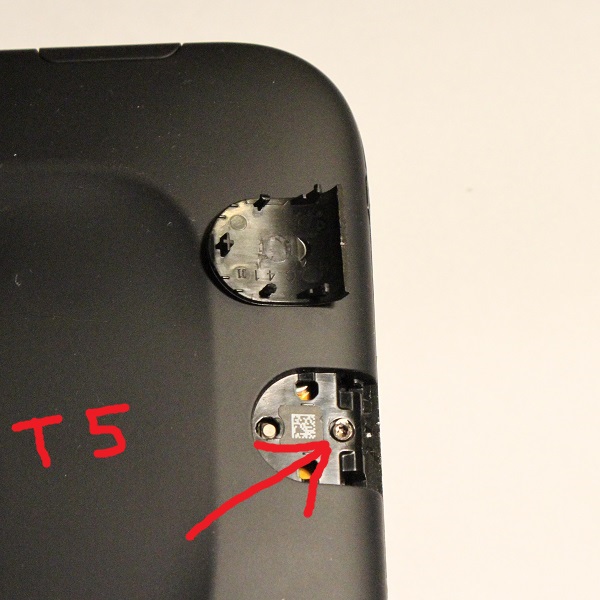
- The head of the Torx screw may be covered with a little piece of tape or sealer - if so, scrape if off and get residue out of the center so the wrench can get a good grip.
- Remove the T5 Torx screw - be very careful handling it, and put it in a container for safekeeping.
- If you drop the screw, kiss it goodbye or get out your magnetic broom and magnifying glass.

Pop Case Loose
- Slide the back case straight down about 1/8 inch, without lifting it or prying it.
- It might take a little pop but you can easily do this with fairly light hand pressure.
- Don't use any tools.
Remove Cover
- The back cover is now loose but be careful opening it.
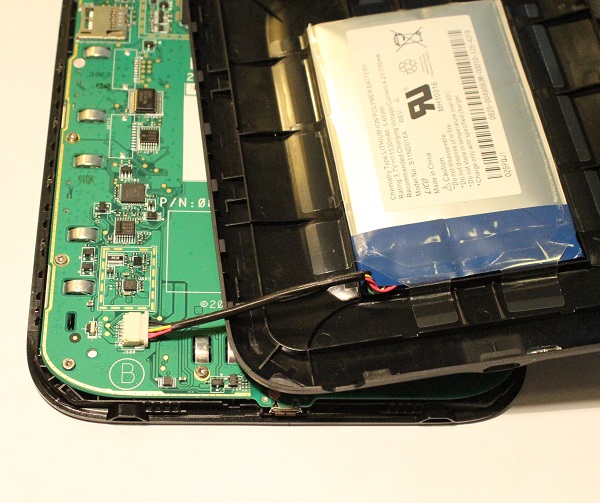
- The battery is mounted in the back cover and connected to the main body by a short cable.
- Be careful with the battery and cable so you don't damage the cable or connector. The cable is soldered to pads on a small circuit board attached to the battery. The wires can come loose if pulled or wiggled since there isn't any strain relief.
- The battery connector can easily be unplugged from the motherboard - it's keyed so it can't be plugged in the wrong way.

Reassembly
- Putting your Nook back together is just a reversal of these steps.
- The battery is wrapped in a couple layers of plastic that hold air, so you may have to squish the back cover down a bit to get it flat against the front case.